Sunday, April 20, 2008

Signs of Spring!

I think it's finally Spring once the forsythia have bloomed...
Here are some pictures of blooms around the house


Wednesday, April 16, 2008

2 down...


Only 48 left to go!

I used the new blades, and they worked much better. I only broke 3 tonight.

The ones in the picture are made out of poplar. I also tried cutting one out of "hardiplank" or "tuffboard" -- I don't remember what it was called, but that rot-proof fake wood. I'm sort of against the idea of using fake wood, but wanted to at least give it a try. It kept sort of melting back together. So I'm nixing the fake wood.

Here's my other picture of what I did on Sunday:


I almost got one whole post done, but it started raining. I fiddled around with my Silent Paint Remover. I don't think the bulbs work - they only glow orange on one side. I took it apart, and thought I found the problem - 2 screws at the electrical connection were missing. But moving the screws that were there into different spots didn't change it. I should probably just suck it up and buy new bulbs.

I'm totally ghetto, because that ladder is still in that very same position.

Tuesday, April 15, 2008

And the Season Begins...

We had a suprisingly warm Saturday. They were predicting cold & rainy, but it cleared up, the sun came out, and we ended up near 70. I had a school group meeting in the morning, and should have done homework in the afternoon, but with that kind of weather, who can resist doing a little yard work??? (especially when your neighbor's tree fell in the yard a couple months ago)

I bought a chainsaw and chopped that sucker up. It took me about 3 trips to the dump to get the little stuff out of there. Then I called Tony to see if he wanted the wood for next winter. He sounded happy. Later Jim told me that he had already promised the wood to Pete... Well, if I had known.... Anyway, they can fight it out for the wood. I just want it out of the yard!

I also bought a scrollsaw to start work on the porch ballusters. I've decided to make sawn balusters, rather than replacing the turned balusters. I like the look of them better. Of course, I've never used a scrollsaw, so there will be a learning curve, but I'm up for the adventure.

Here's a picture from a catalog of the baluster I want to replicate (notice how the center design is similar to the rosette from the earlier post):


So I adjusted the size to the right dimensions and printed it out to make a paper template. Then I tested it cutting a piece of poplar on the saw.

I went through 7 blades, and didn't finish my sample piece :(
But I guess that's how you learn...
Here's what I ended up with after the 7th and last blade broke:


Monday I talked to a guy at work who does a lot of workworking and asked him for advice. He gave me some pointers and also told me to go to Rockler to get new blades. I went there today at lunch, and I think it's my new favorite store!!! I also talked to the guy there about getting a router/router table set up - that may be what I do with my income tax return... hmmm....

Friday, April 11, 2008

Obsessing over Color and Shingles

Besides the bay window, I've been thinking a LOT about what to do under the peaks. A couple summers ago I played around with shaped shingles on the garage face:


I made these shingles out of plain cedar random shingles from Homer using the tablesaw to standardize the width, and the mitersaw to chop the corners. It was a relatively inexpensive solution, compared with what I've found on-line, and it produced the effect I wanted.

I'd like to do something similar under the front and side peaks:


And here is another picture from a "Painted Ladies" book (Pomona & Larson) that shows some ideas for designs to put into the shingles with color:


Of course, that is far too busy for my taste, but if you look closely at it, there are several different simpler individual patterns that could be used:


I kind of like these:


But I also like the diamond pattern in between these two - I used something like that on the garage. Jim thinks they look like cherries, so maybe that's why I like it...

One of the things I've been wondering with this shingle idea is if the scale would be right on the front of the house. The peak is broken up with the top of the bay window and also with the arched window.


Just looking at the house makes it really hard to tell. Maybe because of the crappy condition of the old siding. So tonight I amused myself by working in a photo editor. I copied the garage roof shingles onto the above picture. Let me preface this by saying that I am NOT an expert at photo editing, so don't look at the details, just look at it for an overall perspective. This is what I came up with:


What do you think-
-will it work to do the entire peak in the shingles?

How about this one:


I kind of like that a little better. I think it matches the garage better this way, and it just looks better - maybe because it helps define the peak shape even though it's broken up by the bay window.

What do you think????

Monday, April 7, 2008

Gold Rosettes

After some more searcing on the internet, this is what I found on SFVictoriana. I like it. Maybe I could add above the windows... I'm thinking of just get something like a thin piece of wood about 24" x 6" (not sure the exact dimensions), route the edges & paint it light green. Then I can see if I can add a few of these evenly spaced and painted gold, or maybe just one in the center:

Too fussy for New England?

Saturday, April 5, 2008

Obsessing over Color

As the days start getting warmer, I'm starting to think again about exterior color. I've been looking at my color scheme - particularly in the front of the house and thinking that I don't quite have it right yet. I feel like the dark green brackets above the bay window are too stark of a contrast against the white (which is actually a cream, but still looks very white...) So I pulled out my "Painted Ladies" books (Pomada & Larsen) and looked back at some of my favorite pictures, trying to figure out what I liked about them and pinpoint what I feel is missing in mine.
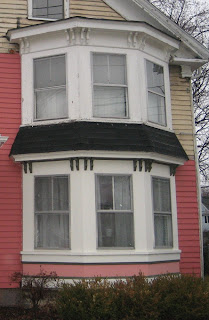


Now, it's a little hard to directly compare my house to, say, San Francisco ornate Victorians, because the style IS really quite different. Houses in this New England neighborhood tend to be much more basic. (I guess that's why they call it a "folk Victorian") But I think I can still do more with color on what I have.

Here are the bay window details on some of my favorites in the books:


What do you think? Can you see what I'm missing? I have a few ideas...
On the brackets, I want to fake some relief by adding a stripe down the middle in a lighter green, like this:

Then on the 1st floor windowsill, I want to paint a medium green. I can then add the missing crown/bed molding under the sill in the dark green.

Then on the side of each window, I can add some light green details. Something basic, or maybe with a center gold highlight.

And above the windows, I could also add another light green detail, with some gold rosettes or such...


And of course, as Jim points out, I really do hate those asphalt shingles in between the two floors. I've already sneaked a peak underneath those, and they were originally wood shingles. I'd like to reshingle it with painted octagon shingles.

Will all of this make it too ridiculous or too fussy? Hard to tell. But I definitely need some medium and/or light green around those brackets. Now, what will be a good medium and light green? Here's the color chips I've been using for the house:

It may be too small to read, but I've marked the 2 reds I've used - the bottom one is the main color - and I've also marked the green on the brackets. The light green I've marked I tried sampling on the back of the house, but it comes out too light, I think:


So maybe the two above the bracket color become medium and light. I'll have to pick up samples to test it out.

I have some more color obsessions, but I'll save those ramblings for tomorrow...

Thursday, April 3, 2008

Floorplan


So the appraiser put together this little sketch of the floorplan. It's not exactly accurate, but it's close enough to post in a blog. I like how he called my closet room the "Sitting Area"........ sounds like a parlour or something. And I like how he added a "closet" to the guest bedroom.

If I knew how to draw things in Autocad, I'd put something together that's a little more accurate, and then I'd show how I want to change the space a bit. But I don't, so you will just have to look at my crude drawing and imagine the kitchen as one straight block - the blue rectangle, and about 6 feet of mudroom/laundry room built on to the left side - the red rectangle. That get's really long and skinny - so maybe there's a kitchen-accessed pantry in the back or something. That's something for Stacey to think about...

What I don't really know is if I should bother to do anything with the 2nd floor in this addition I'm dreaming up... You start wondering how much to spend before it's better to move someplace else. The layout upstairs is so wierd, that you'd get into changing everything just to make a good flow. Or you just make just one giant master suite - and change the attic storage to a master bath, cutting off all the bathroom doors but one. What a novel idea - only having one door in a bathroom... But why have one, when you can have 3???