I have occasionally been doing things around the house. Not nearly at the pace that I was pre-pregnancy (and I thought I was slow then...) But every once in a while, I get the chance to chip away at a project. Vacation days are pretty good for that - I have even a little more time on the vacation days that Morty still goes to daycare.
Right before I had Morty, I was sort of working on a little kitchen cabinet project that I blogged about
here. Well, now that the garage is up and partially wired, I braved the cold temperatures, wearing Jim's insulated Dickey overalls and breaking out a couple of those handwarmers and continued working on it over Thanksgiving and Christmas break.
Here's the left side cabinets with their fake shaker frames put together.
And here's progress on the right side. As I sanded the door fronts down, I was trying to even out the horrible dents in the wood, that are just magnified by the glossy paint. I'm not sure if I made things better or worse, but definitely the frames help camoflauge the bad wood.
Here's the right side, with all the frames up, and starting with a coat of primer. I think I was in a hurry to get things livable when I first moved in, because I used a roller to paint the cabinets. Definitely it was better than the hideous blue, but the roller pattern got on my nerves too after a while. This time I only used a brush. I have a friend (Peter) who can't stand the lines from brushes, so when he painted his cabinets, he only sprayed. I don't think my spray technique is good enough to leave things texture-free.
I LOVE LOVE LOVE how this worked out! Of course, it's all just fake shaker, and the problems with the cabinets themselves and the kitchen still exist (especially on blustery winter days, which we've had a lot of lately), but I am so much more satisfied with the way these look - it just adds depth and interest and helps make thing look so much more... classy? I don't know what the word is, but I like it so much more!
The other project I worked on over Thanksgiving timeframe was a dog feeding station. I found the plan on
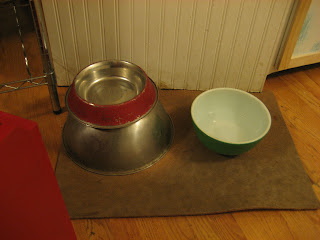
This Old House website. Before I made the project, Abbey's food bowls were a bit of a mismatched, dirty, ghetto mess. She's SO tall that we even put one bowl on top of another big bowl to get it in a better position for her. Goodbye ghetto mix of bowls! (green Pyrex bowl, you go back in the cupboard where you belong!)
Hello feeding station! Two stainless bowls go in the holes. If I ever get around to making another one of these for Oscar (it's in "the plan", I'd make a few minor changes - like for some reason, the plans give measurements using the assumption that a 1x12 is actually 12". I don't know why they did it, and it didn't really end up being a big deal, but it was a little confusing) Notice the face frame on the feeding station now matches my cabinets? hmm? nice, huh?
Then over Christmas I worked on this Vegetable Bin Toybox. Somehow I found this blog by Ana White, where she has all sorts of furniture plans, broken down and simplified. I had been eyeing a similar toybox in the Land of Nod catalogue for Morty, but always felt it looked way to simple to spend the money to buy it. (that's the cheap, penny-pinching side of me coming out - thank you Dad). Ana had a plan for
this box, and so I gave it a try. Turns out either it's way smaller than I thought it would be, or Morty has WAY more toys than I thought. Probably the latter. Again, it's in "the Plan" to make one or two more of these and stack them.
Then the final thing I worked on over Christmas was this "Vinage Industrial" cart. It was a combination of an
Ana White plan and some other plan I found on the internet, that actually referenced the Ana White plan too.
I decided to personalize it a little bit by spray painting the "Natick, Mass" on it. I had a much more complex idea incorporating Jim & Morty's name into a fictional Manufacturing Co. - like a real manufuring factory might have had - but that was way too many letters to create a stencil. So I went with the simple.
The top of the table is actually made of slats from a couple of pallets. I think they were the pallets that the wood pellets came on. They were dirty and gross and needed a lot of sanding, but it sure gave a well-worn look that I was going for. I put a coating of amber shellac on the whole thing. I'm not sure whether or not I like the color. If I were to do it again, I'd probably just do it with clear shellac. But the amber is kind of growing on me.
I found the wheels on Amazon. I think they are Albion wheels. Since I used reclaimed pallet wood and scrap wood from the garage build, the wheels were the most expensive part of this piece!
It doesn't have all the cool hardware of the carts you can find all over at places like Restoration Hardware, Pottery Barn, Barnhouse Electric and the like, but it is a WHOLE lot less expensive! (if you don't count my time - which IS very precious)


