Thursday, August 28, 2008

Paint My Posts

OK, so I'm getting more and more dangerous with the computer painting (though still not any better). I've got to pick out a color scheme for the posts, as hopefully in the next few weekends, if all goes well, I should be able to start painting.

Starting with a shopped-up photo from before (no, I haven't finished painting the front or putting up the shingles yet... and by the way, the balusters are only computer added as well - hey, it makes it seem a little more like the final product!) Here are my proposals for the post colors... starting with the most basic

All Cream:


Green & Gold:


Green & Pink:


Green, Pink, & Gold!


And just to see it all...


What do you think? If I've done this right, there should be a poll on the right hand side...

Monday, August 25, 2008

Does Anyone Know an Easier Way???

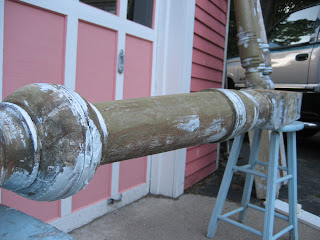
Sanding down the flat sections of the porch posts is fairly easy - I just use the orbital sander. The large convex sections are not even that bad - I can use the sander on those too. And the abrasive string works pretty well on the tight grooves...


But the small and medium convex areas and those 3 concave sections... I'm having trouble figuring out an effective way to smooth them out! I've been using one of these sanding sponges:


and I'm not so pleased with how it's working. Maybe I just have no patience. Maybe I'm worrying too much about something that people will never even notice. Or maybe I just don't have the right tool. And maybe someone out there knows a better way?

Maybe I'll save the hard parts for Jim to do when he comes home this week... hmmm...

Saturday, August 23, 2008

Filling & Faking

My day unexpectedly freed up today, so I put the filler on the porch posts.


This filler epoxy was smelly. But it definitely had a longer pot life than the bondo type filler. This goes into the list of "tedious" jobs. I'm not sure I have the skilled hand to recreate some of the lost profile - at least not well. But I have a feeling it's one of those things that people won't even notice unless they're investigating close up.

And what would my weekend be without at least one tangential project?
The other thing I played with today after I finished filling, was the brackets on the bay window. If you've been reading this, you may recall my earlier post obsessing over the colors around the window. Well, the brackets have continued to bug me, so I finally got some new light green paint and did a test. Here's what it looks like close up:


My attempt was to fake some relief and to make it so that the brackets didn't just look like bland and awkward additions. I think it worked pretty well. It got too dark, so I wasn't able to finish all of them tonight... just gives me something else to work on tomorrow.

Thursday, August 21, 2008

Hard as Wood

Aside from the little front door glass mishap, I've been making some pretty good progress on the porch. Jim is off on his Speed Week adventure, so I've been on my own.

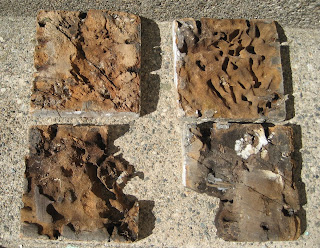
Last night I worked on the porch posts. If you recall, they had some pretty nasty rot on the bottom. I chopped off the bottom 1 1/2 inches to reveal, for the most part, fairly good wood. Here's the chopped off bits:


Niiiiiice. The sawing process was a bit of a fiasco, if you can imagine me trying to maneuver 93.5" 6x6 beams around in my basement by myself. (the basement, by the way, is more of what I'd call a "cellar" and is obstructed by chimneys, structural posts, and pipes and overcrowded with woodworking equipment and clothes washer spare parts) The first post I cut was not such a good job, but as with most things in this renovation project, the more I did it, the better I got at it.

Then today, I went at them with the Clear Penetrating Epoxy Sealer, or CPES from the Rot Doctor. This stuff is supposed to "restore strength to rotten wood while helping to resist further rot in the remaining good wood"

I've brushed that epoxy mix on...


And now I wait 1 - 3 days until I apply the epoxy filler, which I probably won't get to until Sunday.

I've also been working on the balusters. I had started out priming some with aerosol cans of primer. That didn't go very far - I think I got 18 done with 4 cans. So when I went to Homer to get more, I decided to just buy a paint sprayer. Nothing too fancy, but with the amount of woodwork that needs to be done on this porch, it will easily pay for itself versus the ridiculous amount of aerosol cans I'd need at $5 each. And I can use it for priming AND top coats.

While my set up wasn't the best, once I got used to it, the sprayer worked pretty well. And I finished priming all the remaining balusters in good time:


And, lastly (though I actually did this first), I trimmed up the deck boards. They're not trimmed to their final length, but I wanted to be able get on and off the porch without weird contortions or worrying about stepping on unsupported, poorly cantilevered boards. Plus, I think the mailman and the UPS guy are thanking me for it...


Sunday, August 17, 2008

Crap!

You know that SNL skit where Chris Farley is hitting himself and saying "Idiot!" - ya, well that's how I feel today!

After the rain leak issues, our front door has not been the same. It's totally swollen and won't open or close with any sense of ease. So I decided to scrape the multiple layers of paint around the corner that was having trouble. THAT went pretty well. And then I rubbed candle wax on it, and it opens and closes much more normally now. (althought at some point, more work will need to be done to repaint...)


And THEN, for some unknown reason, I all of the sudden decided I needed to get rid of the random security system sticker that has been on the door glass for who knows how long.

So, I took my heat gun and scraper to it. Yes, that's right. I took the heat gun to it. At full heat. You might think I would know better. After all, I have reglazed a couple of windows using this method with varying success. and after all, I am on the "Glass Commodity Team" at work. Yes, that's right - I said the glass commodity team. Over 50% of my job is dealing with glass - suppliers, converting, and processing through high heat ovens. But apparently I left all my "expertise" at work this weekend.

As I'm working on the sticker, with heat gun a-blazin... CRACK!


GRRRRRrrrrr!

I think the only solace I have in this little situation is that because of my contacts at work, I can probably get a replacement light made without too much trouble. But that forces another non insignificant project - it means totally scraping the door, removing the moulding, and reglazing. agh! I have a feeling that's a project for another time. I'll have to live with a ghetto crack at least until the porch is further along.

Friday, August 15, 2008

More Porch Floor Continued

Last night we continued laying the porch floor from the miter to the back. We had a pretty good method going. We prelaid the boards, marked a line for the screw location, and then put hash marks where each screw was to be drilled. Then I would place the individual boards with the nail spacers, and Jim would screw them in. And so on, in assembly line fashion.

It was working well last night, except for the pesky mosquitos. My blood must be like candy to them because I could not keep them away! I ran over the the mini-mart to see if they had any repellant, but unfortunately for me, they had just run out. So I spent my cash on Swedish Fish and diet root beer instead and returned back to the house. (drat that mini-mart!)

Then I remembered that I had a citronella candle in the garage. So we pulled that and a tiki torch out - left over from when we used to have barbeques... While not a perfect solution, I have to say that it did thin out most of the swarms.


And here Jim is, screwing in the last screw of the field boards:


And Taya, with stomach staples freshly removed, supervised all evening from the front door:


Here is the deck, just before we retired for the evening - to eat our 9:30 dinner and watch the Olympics before we fell asleep:

(notice the Swedish Fish and diet root beer placed conspicuously on the porch floor)

Once again, we were kind to our neighbors and refrained from running the saw to trim off the excess boards.

And here it is, in the light of this morning's sun:


It's almost like you can start to see the beginnings of a good porch - a wicked good porch. You might have to squint really hard and use your imagination, but it's there...

Tuesday, August 12, 2008

Porch Floor Continued

We worked a little more for about an hour and a half last night. Here's the progress:


We got the boards laid out and screwed down in front of the door. We thought 9:00 was a little too late to trim off the overhanging boards. What? Like our neighbors have never heard a circular saw before??

Sunday, August 10, 2008

Working in the Pocket of the Storm

I think God must have wanted us to get our boards down today. The weather forecast had us at 70% chance of rain after 3:00. The storm was coming from the south. It got a little dark and the temperature dropped a hair. But this is what we saw when we looked south:


and this is what it looked like to the north:


Very bizarre - it continued this way for the entire evening. Joyce, my neighbor, said it was pouring in Newton, just a few towns away. And apparently it was hailing further north. I think I felt 2 rain drops all evening.

Here's the low down on today's work:

The first thing we did was lay down tar paper. John (contractor neighbor) suggested taking the sawzall and cutting right through the roll and then rolling it out on the frame, rather than trimming after rolling out. One of his "KISS" suggestions - keep it simple stupid. We can use a lot of these suggestions...


Then we pulled out the Azek deck boards. I thought I ordered them with a routed edge... that's what the sample piece had and I wanted what I had in the sample. But there must have been some confusion, because when I opened the packs, the boards had been trimmed down to 3.5, but the cut edge was not routed.

Minor setback. Luckily, I have the router table set up in the basement. So with a change of the bit and a quick test, Jim helped me route enough boards to get going. In the picture below, the right side is the factory edge. You can see that the bottom of the left side is the straight trimmed board, and the top of the left side is where we routed off the square corner:


Then let the geometry begin... we wanted to be very careful and make sure that we were square and that the center, which we were going to miter, would be perfectly along the diagonal board of the frame.


And finally, the first screw!


We used finishing nails as spacers. We also used some large clamps to help hold everything together for the first several courses. We screwed it in 3/4" from the edges on the long side, and 1/2" from the miter edge.


The miter was not 100% perfect - we almost would have had to back cut the pieces to get them to fit together closer. But overall, I'm quite happy with how it turned out. Here's the view from beween the step and the door - where most people will actually be viewing the porch:


This is where we finished for the evening. We still have to lay boards out from both of the edges. But that should be super easy compared to the mitered corner. And then, of course, we will cut all the edges to be even and finish with a trim board. I love it when you can tell that you've done some work...

This one is for Dad

This post is for my dad. He never reads my blog, but always wants to know what I'm doing on the house. It's not like he's a techno-phobe without internet access... - he's on the computer and the internet on probably a daily basis. I think it might be the word "blog"... so maybe if I shame him into it, he just may actually read...?

Anyway, everytime I talk to him on the phone lately, I'm trying to explain the v-groove I'm routing into the balusters. Last time I talked to him, we talked about what was going wrong with the router/table set up and what options I might need to do to make it better...

So Dad, here is the solution we came up with. It seems to work pretty well:


We put a piece of plexi on the table, and then routed up through the plexi to make the smallest opening necessary. Then we left the clamped fence that we originally had as is.

And here is what the routed v-groove on one of the balusters looks like:


This will sit on top of a base rail with a matching profile - as seen in the picture in this link. Does it make sense now Dad?

As I was routing all the balusters, I took a closer look at some of the one I did first and kept in the "good" pile. I looked at them close up, then put them up in rows on the stairs to see if I had them all together if I'd notice all the faults. Blah! I have gotten too good at making them. So even though this is what they look like from a distance:


This is what I will see every time I look at it:


So the first 10 are now in a bad pile!

But the priming has begun:

Wednesday, August 6, 2008

Wedding Weekend

So, I was off to Portland, Oregon for a wedding & friend reunion last weekend:


That left Jim at home to work on the porch himself. He's sort of in a rush because of his Bonneville salt flats speed week trip - he wants to have the porch "done" before he goes. That makes our August schedules slightly out of sink... I just didn't want him to put on the deck boards without me!

Luckily, he obliged. Instead, he did a bunch of bracing and bracketing, and things that don't make for great pictures. But the floor is much more sturdy now.

Here's where the rotted out deck frame just above the stairs has been replaced, 2x4s have been added for blocking, and flashing under the front door was added.


Here's where he added reinforcement to the floor joists:


He also took one of the posts down to take a look at the rot underneath. It's a bit... hmmm... cavernous. Here's a picture I took of the bottom of the post:


We do have some Bondo type epoxy from Homer, and John (the contractor neighbor) gave us another epoxy system that he uses, but then Jim found this site that specializes in rot repair: The Rot Doctor

I told him to go for it and order the stuff up.

The other part of the plan is to maybe cut off some of the bottom length and make a base plate out of hardi-plank or something. Jim made a prototype of that and routed the edges to make it pretty. I'm just jealous I didn't get to use my router first! but comforted in the knowledge that I will get plenty of use out of it...

Monday evening, when I got back, we sat out on the framing and made a list of things that needed to be done (I love lists). I won't bore you with it here. But one change we are thinking of is to switch from overhead lighting to a light next to the door. Jim tells me he thinks he can do that wiring fairly easily now that the floor and ceiling are out. That opens up the choices. I'm currently thinking of this one from Rejuvenation:


Speaking of my favorite reproduction lighting & hardware store... I remembered that they had a retail location in Portland. It was an easy sell to get the people I was with at the wedding to do a side trip. It was fantastic - so great to see it all on display. They had a lot more than what they sell in the catalogue, and I was able to talk with a couple of the folks to get a better idea of what they could do for me.

Although I do have to make one complaint... I was trying to talk to the guy in the salvage area - I bought this door lever for the bathroom a few years ago at Brimfield,


and I've never seen another one like it. I'd love to find another one similar to it, so I tried to ask him about it. He didn't seem very interested in talking to me, and totally dropped our conversation while I was in the middle of it to talk to some girl who walked in. A little wierd and rude. Everyone else was very helpful, though.

Last update is on Taya - she is doing soooo much better! We stopped giving her the pain meds, she's eating her dry food again and drinking water. She's back to being very lively. Still has to wear the E-collar for another week. But I'm so happy she's doing well!